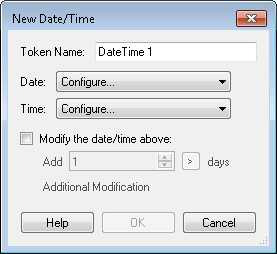
To Configure a Custom Date token
- Use the drop-down menu next to Date to select Custom Date.
- Type in a date or date token, or click the Token button (right arrow)
 to use tokens.
To Configure a Next Day of Week token
This option creates a date token for the first Monday, Tuesday, Wednesday, etc. after a specified date.
Example: You want to send an orientation packet to new employees the Friday after they have been hired. You create a token for the first Friday after an employee is hired by selecting Friday from the drop-down list and inserting the token for the "Hire Date" field.
- Use the drop-down menu next to Date to select Next Day of the Week.
- Select the desired day of the week with the drop-down menu next to The first.
- Next to after, type in a date or date token, or click the Token button (right arrow) to use tokens.
To Configure a Next Month token
This option creates a date token for the first January, February, March, etc. after a specified date.
Example: Every July you send out a summer coupon to new customers. You create a token for the next July 1st after a new customer makes his or her first purchase by selecting July from the drop-down list and inserting the token for the "Purchase Date" field.
Note: To customize this token for a day other than the first of the month, use the Modify the date above option described below to add the desired number of days to this token.
- Use the drop-down menu next to Date to select Next Month.
- Select a month from the drop-down menu next to The first.
- Next to after, type in a date or date token, or click the Token button (right arrow) to use tokens.
To Configure a Specific Date token
This option allows you to customize the month, day, and year portions of the token separately.
- Use the drop-down menu next to Date to select Specific Date.
- Type a month, day, and year as numbers or tokens. After typing in a number, you can use the scroll box (up-and-down arrows)
 to change the numbers. Alternatively, click the Token button (right arrow) to use tokens.
Note: The default values in the month, day, and year text boxes are for the month, day, and year portions of the current date token.
To Configure a Custom Time token
- Use the drop-down menu next to Time to select Custom Time.
- Type a time as a number, or click the Token button (right arrow) to use tokens.
To Configure a Specific Time token
- Use the drop-down menu next to Time to select Specific Time.
- Type an hour, minutes, and seconds as numbers or tokens. After typing in a number, you can use the scroll box (up-and-down arrows) to change the numbers. Alternatively, click the Token button (right arrow) to use tokens.
- Under the seconds value, type whether the time is AM, PM, or 24 hour, or select an option from the drop-down menu. Alternatively, click the Token button (right arrow) to use tokens.
Note: The default values in the hour, minutes, and seconds' text boxes are for the hour, minute, and seconds portions of the current time token.
Example: An employee is eligible for benefits after working at the company for three months. You put the hire date token in the Custom Date box, and select to modify the date by three months. The resulting custom date token will be for three months after an employee was hired.
- To add a unit of time to your token, leave the Add link. To subtract a unit of time from your token, click the Add link to switch it to Subtract.
- Insert a number, or use the scroll box (up-and-down arrows) . Alternatively, click the Token button (right arrow) to use tokens.
- Click the days link to specify a unit of time.
- Optional: Click Additional Modification to make further changes to your custom token.
- Optional: Click the red X
 next to an additional modification to delete that modification.
- Hide the expression details in the Date/ Time Tokens property box by clicking Hide Details.
- Modify a custom token by clicking on the custom token's name or expression.
- Create additional tokens by clicking New Token.
- Delete a token by clicking the red X .
- Reorder custom tokens in the Date/ Time Tokens property box by clicking the green arrows
 to move the tokens up or down on the list.
Note: You can use tokens created with this activity to create more tokens within the same activity. To reference a token created in this activity, the referenced token must be listed before the token that refers to it in the Date/ Time Tokens property box.